
Being able to have several protocols covered with one transmitter is just great since you don’t have to keep a long inventory of senders, each of them with different configurations. Having a multiprotocol TX module installed in your Taranis transmitter will put end to that problem!
This is one of those great flexibilities that enables having a transmitter like the Taranis, as described in our previous article about RC basics.
Contents
The Multiprotocol TX module
The multiprotocol module that we are describing in this review is the 2.4Ghz CC2500 A7105 Multiprotocol TX Module from Banggood.
This module comes ready to be inserted on the back of the transmitter and it doesn’t require major hardware setup to get it working.

Configuring the Multiprotocol module
Before starting
It is highly advisable to get printed a case for this module since it should be placed in a way that a good contact can be ensured with the communication port of the Taranis. A good option for the case can be found here.
Step 1 – Jumper to enable serial communication
Before the module is installed, we need to do some little soldering job. As you can see there is a selector for the different protocols. It works, but it is not that friendly! By jumpering two positions on the board, we can communicate to the module directly from the Taranis menu ;).

Make sure that before moving to the next steps the selector is set to zero!
Otherwise, I can promise you that it wont work … and you will probably waste a lot of time trying to figure out why it is not binding as it happened to me 😉

Step 2 – Download the latest firmware
Next step is to update the Taranis firmware so it can communicate with the multiprotocol module. From my experience, this doesn’t affect your previous configurations or stored models. Just in case, go ahead and do a backup 😉
The latest firmware can be downloaded here http://plaisthos.de/opentx/. Make sure that you chose the latest revision for your Taranis model.
The .bin file shall be saved in the Taranis SD card, in the “Firmware” folder. This is necessary so the bootloader can locate easily the file.
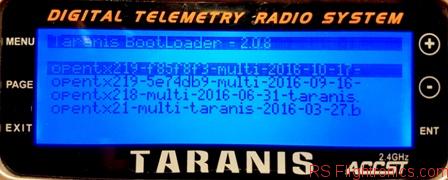
Step 3 – Enter the Taranis Bootloader
This mode can be entered by holding both trim buttons to the center and then switching the sender on.

The following screen shall be displayed as soon as the sender is switched on

Step 4- Select the downloaded firmware
Make sure you select the downloaded firmware from Step 2 and then, follow the instructions.


Once the writing has been completed, we can exit the bootloader mode.
Step 5- Create a new model
With the new firmware installed we should be capable of using the multiprotocol module. In order to to that, we can create a new model. First go to the menu screen, select an empty position and create a new model
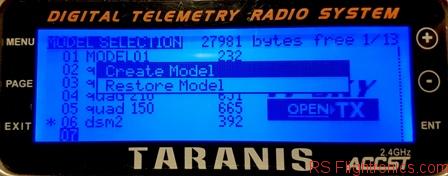
Give the new model a name

Switch off the internal RF module

And switch on the External RF module by selecting the “Mult” option. If you get to see this option, it means that the firmware has been correctly installed. Please notice that this doesn’t mean that the Taranis is successfully communicating with the multiprotocol module unless the protocol selector on the board is set to position zero!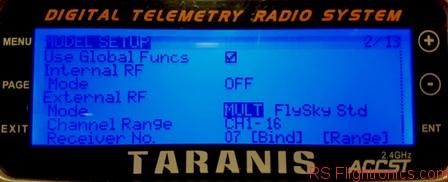
Select the desired protocol, bind and you are ready to go!!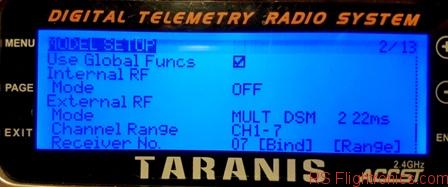
Conclusion
This module works pretty well and is not complicated to configure. I still need to run a range test but I can already confirm that for indoors works great!
Please subscribe and keep tuned for further updates! Your comments and questions are always welcome!
